Animation Tab
The Animation tab is where you can create and modify Animations. Here you can choose from a variety of Animations, create color palettes, and customize the Animation’s settings. Selecting certain Animations will cause additional controls to appear, letting you change parameters specific to that Animation.

Choosing an Animation
Select an Animation using the Type drop-down. For all Animation types, you can modify basic options such as:
Orientation: Which direction the Animation moves in.
Reverse: Whether to run the Animation forwards or in reverse.
Fade: Whether to gradually transition between colors or jump from one color to the next.
The Palette drop-down lets you select the color palette used to draw the Animation. Continue reading to learn more about customizing Palettes.
Tip
To reapply a Palette after customizing it, reselect it from the drop-down.
The Center controls change the location where the Animation is centered on the grid. This only applies to certain Animations, such as Radial and Mandelbrot.
Timers
Timers control how frequently the Animation is updated.
Cycle Interval sets the amount of time (in milliseconds) between Animation cycles. A cycle is the amount of time required for a single pixel to change from one color to the next. For example, a Blink Animation has two cycles: one to turn each pixel off, and one to set each pixel back to its initial color. A Blink Animation with a cycle interval of 1000 means the animation takes 2 seconds to complete: 1 second to turn off, and 1 more second to turn back on.
Delay Interval sets the amount of time (in milliseconds) to wait before starting a new cycle. For example, if a Blink Animation has a delay interval of 2000, then the animation will pause for 2 full seconds at the end of each cycle before starting the next cycle. This is only available while fading is enabled.
Controlling Playback
Next to the general Animation settings are the playback controls. Clicking the playback button starts and stops the Animation. While the Animation is paused, you can skip to a specific cycle by entering the cycle number in the Current Cycle text box.
Customizing Color Palettes
The Palette Editor lets you create your own custom color palettes or modify existing palettes. To open it, click Edit Palettes…
Creating a New Palette
To create a new palette, click New Palette. Enter a name for the new palette, the number of colors in the palette, and the type of palette:
Blank sets all colors are black.
Random randomly generates each color.
Scaling gradually scales from the first color to the last color. Select Mirror to scale from the first color to the last color, then back to the first color. This is useful for seamlessly blending Animations from one cycle to the next.
Comet creates a comet-like effect where it scales from last color to first color, then back to last color. Start sets the position of the first color, and length determines how long the “tail” is.
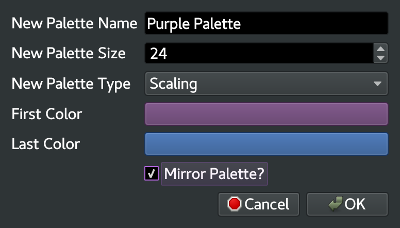
Click OK to generate and save your new palette.
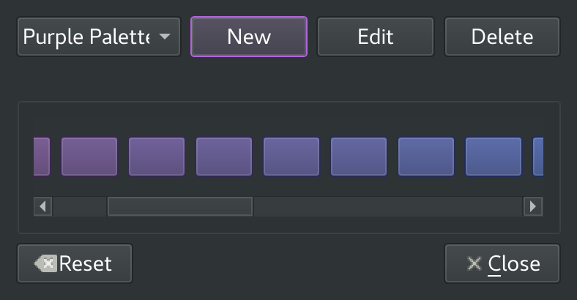
Selecting and Editing a Palette
The drop-down in the top left corner lists all available palettes along with a preview of the first five colors. Selecting a palette displays each of its colors. You can change any color by clicking on it and selecting a new color from the popup dialog. Clicking the Edit button lets you change the palette’s name, size, or color scheme.
You can also delete a palette by selecting it and clicking Delete. This won’t affect any Maestro components that are currently using the palette.
Resetting Palettes
To revert back to the default settings, click the Reset button. This will remove all customizations and restore the default palette set.